May 28, 2013

You Can Use QuickBooks in Your Law Firm

QuickBooks is the number one small business accounting software and for good reason. It is easy to use and reasonably priced. QuickBooks can do the following things that attorneys generally need:


  • Client Information – Track Client contact information and case information.

  • Track Billable and Non Billable Time – QuickBooks has a great Time Tracking feature. An attorney can track their billable and non billable time for their clients. It also has a Timer program that comes separate and able to run without QuickBooks. This enables everyone in the office to track time and the bookkeeper and pull the time into QuickBooks.

  • Tracking Postage, Copies and Other Client Costs – QuickBooks can help you keep track of postage, copies and other client costs so that you can easily bill your clients.

  • Billing Rates and Price Levels – You can create custom price levels for your clients. It can also track Billing Rate levels that can be associated by the time keeper. (This is available in the Professional Services edition.)

  • Conflicts of Interest – In the 2009 versions and later of QuickBooks you have the ability to do advanced searches quickly and easily within your customer list.

  • Retainers – Yes you can track retainers in QuickBooks. Reports can easily be created and memorized so you will always know what money you are holding in retainers.

  • Trust Accounting – Easily track the money you are holding in trust and create reports to help you stay in compliance with Trust Accounting Laws.


QuickBooks also has the ability to:


  • Write checks

  • Link to online Bank Accounts

  • Accounts Receivable

  • Accounts Payable

  • Payroll

  • 1099’s


You Can Use QuickBooks in Your Law Firm

April 23, 2013

Schedule Backup in QuickBooks

This week alone I have had two people call me asking me how to restore a QuickBooks backup file.   One call was the result of a computer crash, the other has no idea what happened, it just stopped working.   Unfortunately for both of these callers,  the last backup they had was in early March when they made one for their CPA.  So all of the work that they had done between now and March was gone.  Terrifying thought, isn’t it?


This does not need to happen to anyone. There is a  built  feature that will allow you to schedule a backup in QuickBooks to a location you choose.  It runs automatically, and this way it is done for you without you having to remember to run it.


While best practices dictate that you should be backing up to a remote drive or an external device, like a thumb drive or external hard drive, we have found that just having a backup on the computer can be a lifesaver when you get a corrupted datafile.  And if you are running an online backup program like Crash Plan or Carbonite or even Dropbox, you will get your nightly backup file backed up to the cloud and you will be double safe, having a local and off-site backup.  One thing that we have found through many years is that there is no such thing as backing up too much.


Schedule Backup In QuickBooks Automatically


Here are the steps for setting up an automatic backup job.


Click on File from the Main Menu and choose Create a Backup.


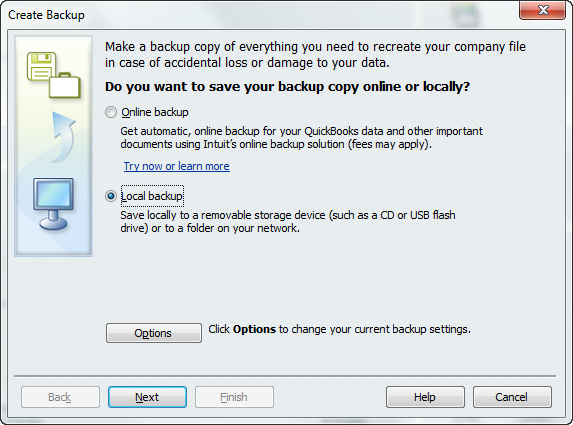
On the frist window (Figure 1.1) choose Local backup and click Next.
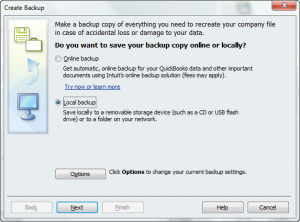


Schedule Backup in QuickBooks Figure 1.1

Figure 1.1


Choose the location.   I am choosing my Dropbox folder.   This way if my hard drive crashes,  I have a backup in a remote location that I can get to from anywhere.  On this screen (Figure 1.2)  you can also limit the number of backups to keep in the folder, so you don’t have to worry about disk space.


Change any additional settings, then click Next.
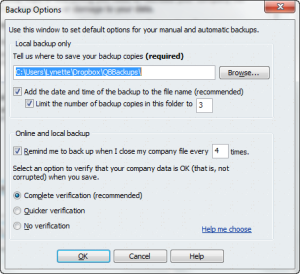


Automatic backups in QuickBooks Figure 1.2

Figure 1.2


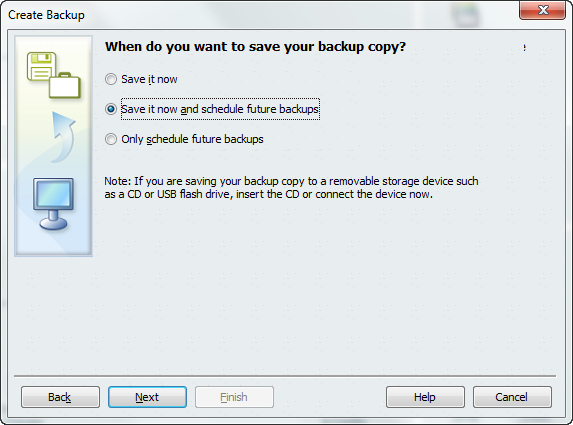
On this screen (Figure 1.3) you are given several options for running your backup. Choose the Second option, Save it now and schedule future backups so that you can configure your automatic backup options.


Click Next when you are done.
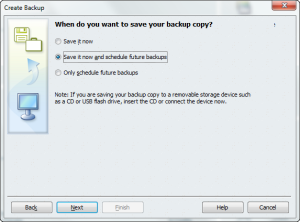


Automatic backups in QuickBooks Figure 1.3

Figure 1.3


This next screen gives you the options for your automatic backups.  You have several options that you can set, including days and time to backup. I have mine backing up daily.   I am keeping 8 days of backups and     I set it to do it in the early morning and every workday.  Remember that you computer has to be on in order for the backup to run, so if you turn your computer off each night, make sure that you select a time to run when the computer will be powered on.
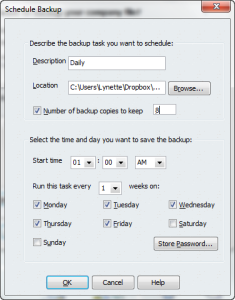


Automatic backups in QuickBooks Figure 1.4

Figure 1.4


You will need to store your password, so that the program will have the permissions it needs to run automatically. Click on Store Password, enter your password and then click Finish.


TaDa!  Now you have a scheduled backup of your Quickbooks data file.   Now, you have one last step to make sure that you backup is running.  Tomorrow, check you backup folder and make sure that your new backup file is there.  I would put a reminder in your calendar for the next few days to make sure that it did run successfully, then set a reminder to check at least every 2 weeks.  Nothing is worse that thinking that you are backing up than to find out when you need it that there was a problem, and it was not running.


I also advise my clients to restore a backup a couple of times a year to make sure that all is well with the backups.  You can never bee too sure!


If you have any other tips for backing up, tell us below.  We would love to hear from you.


Schedule Backup in QuickBooks

March 28, 2013

QuickBooks 2013 R6 Now Available

We have just learned that Intuit has released a new update for QuickBooks 2013 – R6.  We recommend all users install this update, especially if you are one of the users that suffered from the Unexpected QuickBooks crash issue that we mentioned a few days ago.


According to Intuit this updates makes that following changes -


  • Resolved QBW32.EXE Fatal Application Exit error (Unrecoverable Error 02700 80318)

  • Improved performance.

  • Added the ability to change the Company File Color Scheme

  • Added Windows 8 support for the QuickBooks Attach Documents scan manager.

  • Added Monthly payroll item limits.


Your QuickBooks should alert you when this update is available  but if you want to check and install it manually you can follow the instructions below.


I just ran the update and it took a few minutes on my machine to finish and I had to restart my computer.   When I opened my company file the color scheme was changed and it updated my datafile.   If you share your datafile you will all need to update to use the company file.   So far so good.  No crashes.


Manual Update


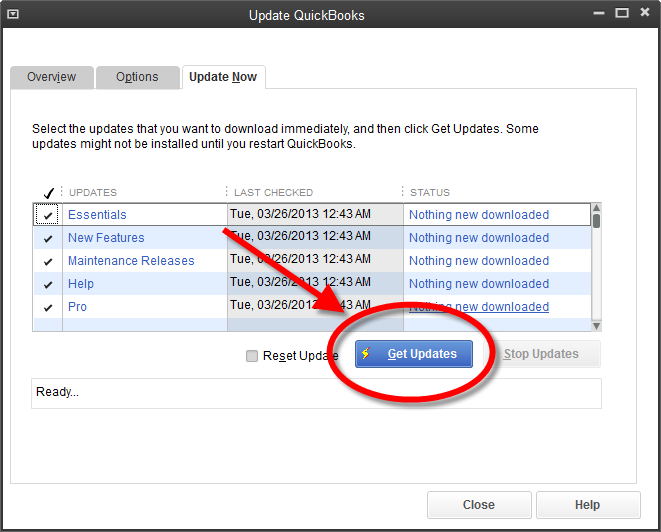
To run a manual update, click on Help, then Update QuickBooks.  On the fist page of the Update QuickBooks window click on the big blue Update Now button.  That will bring up the Update Now tab and you can then click on the blue Get Updates button.


quickbooks-updates

Click to Enlarge


Allow a few minutes for all of the updates to download, then when it is finished, close QuickBooks and re-open.  QuickBooks will install your new updates and you should be good to go.


QuickBooks 2013 R6 Now Available

March 27, 2013

QuickBooks 2013 Closing Unexpectedly

Over the last few days i have had a number for clients contact me because QuickBooks 2013 for windows had shut down right in the middle of doing something.  People seem to see different messages and errors, but they are all doing the same thing.  There seem to be a number of people that have experienced a similar problem – QuickBooks just shuts down unexpectedly.


I have done some digging and this is what I have found.  First it seems to be isolated to QuickBooks 2013 running on Windows 7 PC’s.  Not sure what the correlation is, but it looks like those users are the ones most effected.   There are a couple of Knowledge Base articles that Intuit has posted that can be related tot he issues -


  • SLN65647 - Unrecoverable error: 15346 90861 when clicking on Review 1099 vendors in 2013


  • SLN65483 - Error: QBW32.EXE – Aborting Application: QuickBooks is now terminating when working in 2013


I also read that Intuit was aware of an issue and that they had released an update to correct the issues – Release 5 (R5).


Service Releases & Updates


The first step I would recommend to help with this issue (or any issue) is to make sure that your QuickBooks is up to date with all the latest software updates.  If you have ever opened QuickBooks and were greeted with the message that there are “updates available, do you want to install them” I would advise that you install them.  It only takes a few minutes, but it is how Intuit keeps the program up to date and running smoothly.  As issue are found, they are addressed by Intuit and put together in a service release.


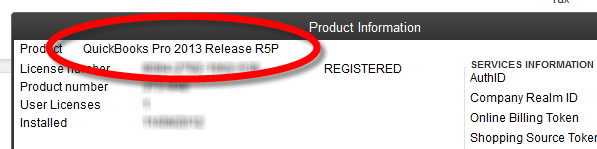
You can easily check to see what version you are using by opening QuickBooks the press CTRL + 1  (that is hold down the CTRL key then press the number 1).  This will bring up the product information window. Listed right at the very top is the version number.


product-information-screen


If you are not on R5, then you will need to update your QuickBooks.  To do this, click on Help, then Update QuickBooks.  On the fist page of the Update QuickBooks window click on the big blue Update Now button.  That will bring up the Update Now tab and you can then click on the blue Get Updates button.


quickbooks-updates

Click to Enlarge


Allow a few minutes for all of the updates to download, then when it is finished, close QuickBooks and re-open.  QuickBooks will install your new updates and you should be good to go.


Still Having Issues


We are seeing that those that are running R5 can still have issues even with the install, so be aware. If you are still having issues, continue to check for updates and you can contact Intuit directly.  We will continue to check on this issue and let you know if we hear anything, as well as when new updates are available.


QuickBooks 2013 Closing Unexpectedly

March 26, 2013

Memorizing Reports in QuickBooks

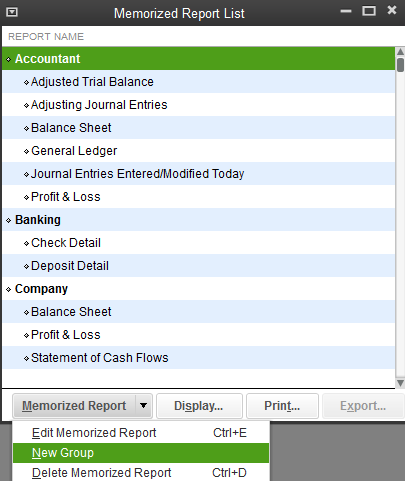
QuickBooks allows you to memorize reports that you have customized so you can quickly print them again.   However you want to organize your memorized reports to make it easier to find.   The first step is creating a Memorized Report Group.   To do this Click on Reports from the Main menu and choose Memorized Report List.  When the window comes up click the Memorized Report button at the bottom and choose New Group.


1.1MemorizeList

Figure 1.1 Click to Enlarge


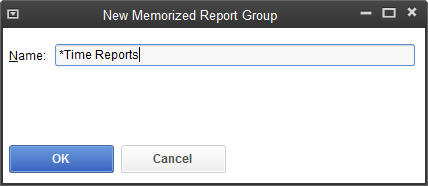
We are going to create a group called *Time Reports.   Now the reason I put a * in front of Time is so it shows up at the top of the list.   Click OK when done giving your group a title.


Figure 1.2 Click to Enlarge

Figure 1.2 Click to Enlarge


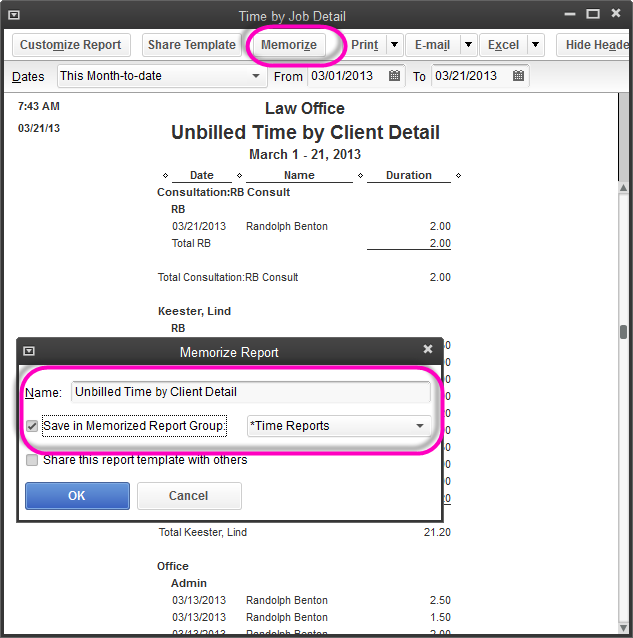
I have a report I customized to show unbilled time by client detail.   I want to save this report in my memorized report group.   Click the Memorize button at the top of the report and select Save in Memorized Report Group.


1.3Mem

Figure 1.3 Click to Enlarge


When you save all the reports in the group it makes it easier when it is time to print these reports.   Simply click on the Memorized Report List and choose the group.  At the bottom of the Report List you will see a button to Display or Print.


Figure 1.4 Click to Enlarge

Figure 1.4 Click to Enlarge


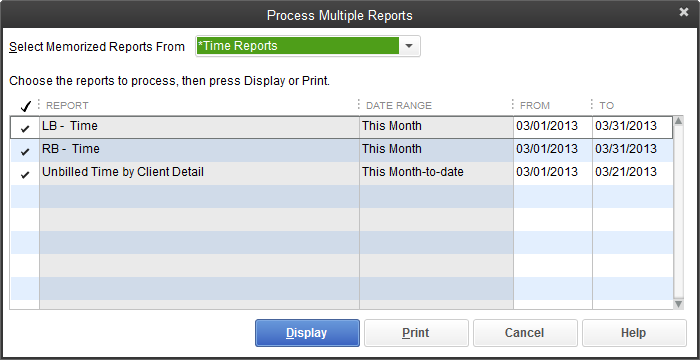
When we click Display it will bring the list up to select all or just some of them.


Figure 1.5 Click to Enlarge

Figure 1.5 Click to Enlarge


TaDa!  Instant Reports.


Figure 1.6 Click to Enlarge

Figure 1.6 Click to Enlarge


Memorizing Reports in QuickBooks

October 31, 2012

Trust Accounting using QuickBooks

Recently I have noticed alot of information on the web talking about trust accounting using QuickBooks. I also notice that people are suggesting making subaccounts under the bank account for each client. This is a method I do not recommend doing. It limits you on having to make one transaction for each client. If you only have a few clients and a few clients in your trust account this may work for you but it will become very cumbersome when your practice starts to grow.

Key things to remember when setting up your trust account.

You need to be able to provide the reports on a monthly basis to show activity for each client, sometimes called a client ledger.

You need to be able to have a report that shows all the activity in the trust account and clearly identified for each client.

You need to reconcile your trust account monthly with your bank statement.

If you print a Balance sheet report in QuickBooks and the Trust account does not equal the Trust Liability you setup then something is wrong. All money going into and out of trust should be coded to Trust Liability. I recommend using subaccounts under the trust liability but you can just use the customer name.

You want to make your system easy enough that at any given time you can identify who has what in trust. This is a very important part of your business.

You never want to be in a position that you bounce a check in the trust account. If you mess this up it can cause the bar association to step in and look at what you are doing.

If you need help or would like me to review your current Trust Accounting procedures I would be happy to help. You may call me at 904-284-4480 or email me at Lynette@attorneystechnology.com

October 30, 2012

Tracking Time in QuickBooks


Attorneys can track time in QuickBooks and bill their clients.  You do not need to buy any other software to make this work.  It is in QuickBooks.  


QuickBooks gives you two options for entering time (you can switch back and forth between either methods at any time).  In either case, be sure to enter as complete a record as possible if you want your time to accurately and completely transfer to invoices and statements or show on reports. 


Single activity time entries are convenient to use if you will be continuously running QuickBooks, and entering each activity as you do it, rather than entering all your time at the end of the week from a paper timesheet. One advantage is you can use the timer to time your activity. 
1.      Click on Enter Time from the Home Page.
2.      Click on Time/Enter Single Activity.
3.      Choose the Date in the Date field.
4.      Choose the Employee in the Name field. 
5.      Choose the Client, and job if you are using jobs, in the Customer: Job field.
6.      Choose the Service Item. For example consulting, court appearance or telephone conference.
7.      Enter the time spent.
8.      Make sure there is a √ in the Billable box if you are going to bill the client.
9.      Enter a description in the notes area.  This will be able to be pulled into the invoice or statement.
10.    Click on Save & Close if you are finished entering time or Save & New if you want to enter more time.


The weekly timesheet in QuickBooks is useful when you enter time at the end of a week or a certain period, working from a paper time record.
1.      Click on Enter Time on the Home Page.
2.      Click on Use Weekly Timesheet.
3.      You may want to change the date range for the time sheet.  To do this click on the small calendar icon to the right of the date.  Select a new date.  The new date range will appear.
4.      Choose the Employee in the Name field.
5.      Choose the Customer in the Customer: Job field.
6.      Choose the Service Item.
7.      Enter a description in the notes area.
8.      Click on the date column and enter the time spent.
9.      Mark it billable if you want it to show up on the client’s invoice or statement.
10.    Continue until all time is entered then click Save & Close. 


QuickBooks service items are used on the time sheets.  You may want to think about how you want to see your income and set up your items accordingly.   If you need help I am available to help you get started with tracking time in QuickBooks.   You may call my office at 904-284-4480 or visit www.attorneystechnology.com for more information.