To setup users and passwords:1. Click on Company from the Main Menu.
2. Click on Setup Users and Passwords.
3. Click on Set up Users.
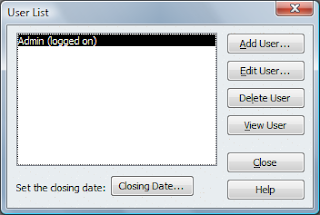
The User List box will appear. This lists all of the users that are currently set up. The Admin account is set up by default. You may want to set a password for the Admin account, click on Edit User. Enter the new password and enter it again in the confirm password box. Select a challenge questions, and input the answer. When you are finished, click on Next. Click on Finish to complete the process.
Now we can add Users to your QuickBooks file.1. Click on Add User. Type in the name they will use to log in with and a password. Click Next.

2. Choose Selected Areas of QuickBooks.

3. Since Julie is going to be helping with billing and receiving payments we will want to give her full access on the Sales and Accounts Receivable window, choose Full Access and click Next.

4. Go through the additional windows and choose the options that fit your user.
5. Once you are done you will see a summary of the choices you picked. You can now review them and then click Finish. It is a good idea to log off and then log back on as them so you can test it out and make sure you have selected the right choices.

If you need help with learning more about QuickBooks I offer online consulting services. To find out more visit our Quickbooks Consulting service page at attorneystechnology.com.
No comments:
Post a Comment